
If you’ve ever unfolded a sewing pattern and thought, “What do all these lines and symbols even mean?”—you’re definitely not alone. At first glance, patterns can look confusing, almost like a secret code. But the good news is that once you learn how to read them, sewing patterns become your best guide, walking you step by step through creating something amazing from scratch.
In this post, I’ll go over the basics of reading a sewing pattern in a simple, approachable way. You’ll get to know the most common symbols, terms, and instructions, along with a few handy tips to make things easier as you go. Whether you’re brand new to sewing or just brushing up on the basics, understanding patterns will open up a whole new world of projects you’ll be excited to try.

Learning to read a sewing pattern is like learning a new language. It can feel overwhelming at first, but once you understand the key symbols and terms, a whole world of creation opens up. This guide will break it all down for you.
Quick Navigation Menu
Choosing & Understanding Your Pattern
The Pattern Pieces & Instruction Sheet
Essential Sewing Pattern Terminology
What Does 45 and 60 Mean On a Sewing Pattern?
Understanding a Sewing Pattern Envelope
Before You Cut – Choosing & Understanding Your Pattern
The Pattern Envelope: Your Shopping Guide
This is the first thing you see. It’s not just pretty artwork; it’s packed with crucial information.
Front of the Envelope:
– Pattern Number & Brand: (e.g., Vogue 9254, McCall’s M8046). This is how you find it again.
– Design Variations (Views): Most patterns include multiple versions of the same garment (View A, B, C, etc.), often with different sleeve lengths, necklines, or hem details.
– Sizing: The specific sizes included in that envelope.
Back of the Envelope:
– Body Measurements & Size Chart: CRITICAL STEP! Do NOT assume your ready-to-wear size is your pattern size. Pattern sizing is different. Take your bust, waist, and hip measurements and use the chart on the envelope to find your correct pattern size.
– Fabric Suggestions: Recommends suitable fabrics (e.g., “lightweight linen, chambray, voile” for a blouse). Do not ignore this. Using a stiff fabric for a flowy design will ruin it.
– Fabric Amount (Yardage): Tells you how much fabric to buy for your size and view. It also lists amounts for interfacing, lining, and notions like zippers or buttons.
– Finished Garment Measurements: Sometimes included. This shows the actual measurements of the sewn garment, which will be larger than your body measurements to allow for ease (wearing comfort and style).

The Pattern Pieces & Instruction Sheet
Once you open the envelope, you’ll find:
– The Instruction Sheet: A large sheet of paper with written steps and diagrams.
– The Pattern Tissue: Large, thin sheets of paper with the pattern pieces printed on them.
Decoding the Pattern Instruction Sheet
This is your roadmap. It’s usually divided into sections:
– General Directions: Read this first! It explains the pattern’s specific symbols, cutting layouts, and general sewing tips.
– Cutting Layouts: Diagrams showing how to arrange your pattern pieces on the fabric for different widths, sizes, and views. This helps you save fabric.
– Step-by-Step Guide: Numbered instructions with illustrations guiding you through the construction process for each view.
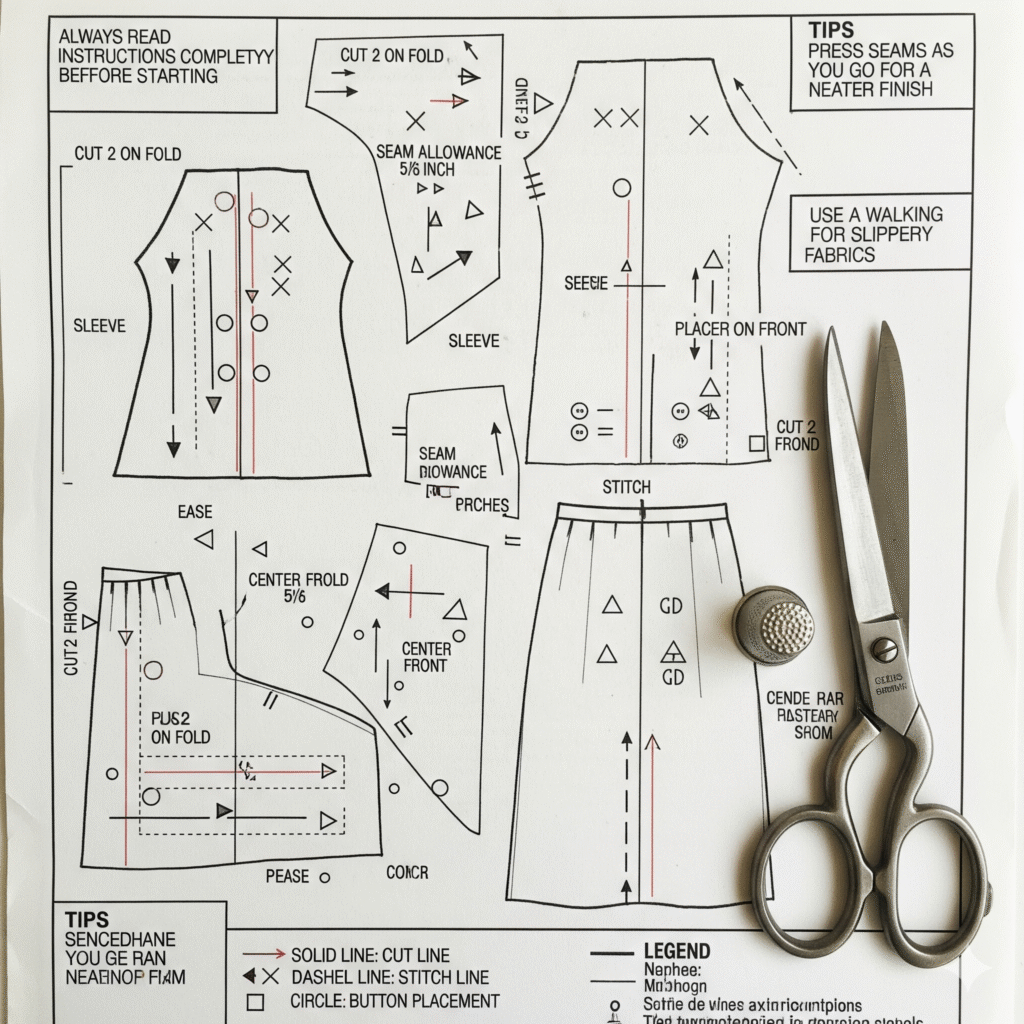
Understanding Pattern Symbols (on the tissue pieces)
These symbols tell you how to cut, align, and sew the pieces.
– Cutting Line A thick, outer solid line. Sometimes has scissors icon. Cut along this line.
– Grainline A straight line with arrows at both ends. Place this line parallel to the fabric’s selvage (the finished edge). This ensures your garment hangs correctly.
– Fold Line A line that looks like a bracket: —⋀—⋀— Place this line directly on the fold of your fabric. You will cut around the other three sides, creating a symmetrical piece without a center seam.
Notches Small triangles or diamonds on the cutting line. Matching marks.
– A single notch (△) on the front armhole matches to a single notch on the front sleeve. A double notch (△△) on the back armhole matches to a double notch on the back sleeve. They help you align pieces accurately. Tip: Cut outwards from the triangle, don’t try to cut the triangle shape itself.
– Dots, Squares, & Triangles Various small shapes inside the cutting lines. Match points. These indicate where to place pockets, match seams, gather fabric, or where two pieces join at a specific point.
– Dart Lines A solid or dashed line, often with a point. Fold and sew along this line to create shape (e.g., for bust or waist shaping).
Adjustment Line Two solid lines, often near the waist or hem. “Lengthen or Shorten Here.” Cut between these lines to adjust the pattern’s length.

Essential Sewing Pattern Terminology
– Selvage: The tightly woven, finished edge of the fabric that runs parallel to the grainline.
– Bias: A 45-degree angle to the grainline. Fabric cut on the bias has more stretch and drape.
– Ease: The extra room in a garment beyond your body measurements. Wearing ease is for movement. Design ease is the stylistic extra fullness.
– Interfacing: A supportive fabric ironed or sewn onto main fabric to add structure (e.g., to collars or cuffs).
– Right Side/Wrong Side: The “right side” (RS) is the outside of the fabric (the pretty side). The “wrong side” (WS) is the inside.
– Baste: To sew with a long, temporary stitch by hand or machine. This is used to hold pieces together before final sewing and is easy to remove.
– Clip/Notch (in instructions): Clipping is making small cuts into the seam allowance (e.g., around a curve) so it lies flat. Notching is removing small triangles of fabric from the seam allowance (e.g., on a convex curve) to reduce bulk.
– Understitching: Sewing the seam allowance to the facing or lining to help it roll to the inside and stay hidden.
– Topstitch: A visible row of stitching on the right side of the garment, often for decorative purposes or to hold layers flat.
Pro Tips for Success
– TRACE YOUR PATTERN, DON’T CUT IT! Especially if you are between sizes or think you might make adjustments. Use tracing paper, medical exam table paper, or Swedish tracing paper to copy your size onto. This preserves the original for all other sizes.
– Pre-Wash Your Fabric. Wash, dry, and iron your fabric exactly how you will launder the finished garment. This prevents shocking shrinkage after your first wash.
– Transfer All Marks. Use tailor’s chalk, a tracing wheel and dressmaker’s carbon paper, or washable markers to transfer all dots, darts, and notches from the pattern onto your fabric. This is a non-negotiable step for accurate sewing.

– Do a Mock-Up (Muslin). For fitted garments or expensive fabric, make a test version out of cheap muslin or an old bedsheet. This allows you to check the fit and make adjustments before cutting your good fabric.
– Read the Entire Guide First. Before you touch your fabric, read the instruction sheet from start to finish. This helps you understand the construction process and anticipate tricky steps.
– Press, Press, Press! Sewing is 50% stitching and 50% pressing. Press your seams after every step for a professional, polished finish.
Start with a simple pattern labeled “Easy” or “Beginner.” With patience and practice, you’ll be decoding patterns like a pro in no time.
What Does 45 and 60 Mean On a Sewing Pattern?
This is a fantastic and very common question for those new to sewing. The numbers 45″ and 60″ on a sewing pattern refer to the width of the fabric you are intended to use.
Here’s a detailed breakdown of what that means and why it’s so important.
The Short Answer
– These numbers indicate the two most common standard widths for fabric bolts (the rolls fabric is sold on). The pattern’s instruction sheet is designed to provide a correct amount of fabric and accurate cutting layouts for both of these widths.
– 45″ (often 44″/45″): Standard width for many quilting cottons, apparel fabrics, and linens.
– 60″ (often 58″/60″): Common width for knit fabrics, home decor fabrics, flannel, and many bottom-weight fabrics.

The Detailed Explanation
It’s All About the Cutting Layout
The primary reason these numbers are listed is to guide you to the correct fabric layout diagram on your pattern’s instruction sheet.
Pattern instructions include several diagrams showing how to arrange the pattern pieces on your fabric to minimize waste. These layouts are completely different for 45″ wide fabric versus 60″ wide fabric.
Example:
On 45″ fabric, the layout might place pieces side-by-side because the fabric isn’t wide enough to fit them all across.
On 60″ fabric, the layout might place all the pieces in a single layer across the wide fabric, or use a more efficient folded layout, ultimately requiring less length of fabric.
Understanding a Sewing Pattern Envelope
Understanding a sewing pattern envelope is a fundamental skill. It’s your pre-shopping guide and cheat sheet, packed with all the information you need to choose the right pattern, fabric, and supplies.
Here’s a detailed guide to deciphering every part of a standard pattern envelope, using the front, back, and inside flaps.
The Front: The Inspiration
This is the glamorous side designed to catch your eye.
– Pattern Number & Company: This is the pattern’s unique identifier (e.g., Vogue 1542, McCall’s M8046, Simplicity 8014). You use this number to find it in a store or online.
– Design Illustrations/Photos: These show the different styles (“views”) you can make with this one pattern. They are usually labeled with letters (View A, B, C, D).
– Description: A brief text description of the garments (e.g., “Misses’ dress and belt with collar and sleeve variations”).
– Size Range: Clearly states which sizes are included in this specific envelope.
The Back: The Technical Specifications
This is the most information-dense part. This is where you plan your project.

Body Measurements & Size Chart
This is the most important step and where many beginners go wrong.
What it is: A chart listing the body measurements for each size the pattern is drafted for (e.g., Bust, Waist, Hip).
How to Use It:
– Take your own measurements (bust, waist, hip) accurately.
– Compare your measurements to this chart, not to the ready-to-wear size you normally buy.
– Choose your pattern size based on your measurements. Your pattern size will almost always be different from your retail clothing size. If your measurements fall between two different sizes, choose the larger size.
Finished Garment Measurements
What it is: A small chart, often near the size chart, that lists the actual measurements of the garment once it’s sewn (e.g., “Finished Bust”).
Why it Matters: This tells you how much “ease” (wearing room) the designer has added. A dress with a 36″ Finished Bust measurement based on a 34″ body measurement has 2″ of ease. This helps you understand how fitted or loose the garment will be.
Suggested Fabrics
What it is: A list of fabric types that will work well for this design (e.g., “linen, rayon, challis, crepe”).
Why it Matters: This is a suggestion, not a strict rule, but it’s very important. The pattern’s construction and drape are designed for these types of fabric. Using a stiff denim for a pattern meant for fluid chiffon will not yield the same results.
Notions List
What it is: A checklist of all the non-fabric items you need to complete the project.
Examples: Zipper (type and length specified), buttons (size and quantity), elastic, thread, interfacing, bias tape, etc. Use this list when you go shopping!
Yardage Charts (Crucial!)
This is where the 45″ and 60″ fabric widths come into play.
What it is: A table that tells you how much fabric to buy for each view and size.
How to Read It:
– Find your pattern size (from the size chart).
– Find the view you want to make (View A, B, etc.).
– Find the fabric width you plan to use (usually 45″ or 60″).
Read the chart where these three factors meet to find your yardage.
Special Notes: The chart will also specify yardage if your fabric has nap (like velvet or corduroy) or directional prints (like large stripes), as these require more fabric to match patterns.
The Inside Flaps: The Instructions
When you open the envelope, the information on the flaps provides more detail.
Line Drawings: Black and white technical sketches of each view. These are often more useful than the front photos as they show design details like darts, seams, pockets, and topstitching lines very clearly.
Fabric Layout Diagrams: These are schematic drawings that show you how to lay out your pattern pieces on your fabric (folded or unfolded) for each view, size, and fabric width (45″ or 60″). This is a guide to minimize fabric waste.
Description of Back Views: Often shows what the back of the garment looks like for each view.
Cutting Guide: Lists all the pattern pieces required for each view, helping you identify which ones to cut out.
How to Put It All Together: A Step-by-Step Guide
Find Your Size: Take your measurements and use the size chart on the back. Ignore your ready-to-wear size!
Pick a View: Decide which version of the pattern you want to make (e.g., View A with long sleeves).
Choose Your Fabric: Consult the “Suggested Fabrics” list. Buy a “muslin” (cheap test fabric) if you’re making a fitted garment for the first time.
Buy the Right Amount: Use the yardage chart on the back to determine how much fabric to buy for your size, view, and fabric width.
Gather Notions: Use the notions list to purchase everything else you need—zippers, buttons, etc.
Wash and dry your fabric as you plan to launder the finished garment to prevent future shrinking.
By taking the time to thoroughly read and understand the pattern envelope, you set yourself up for a successful and much less frustrating sewing project
Related Reading
How to Read a Sewing Pattern: Symbols, Terms, and Tips
Top 10 Things Sewing Patterns Don’t Tell You
From Novice to Pro: Your Guide to Pattern & Measurement Skills
5 Easiest Sewing Patterns for Absolute Beginners
How to Build Confidence When Using Sewing Patterns